 Save
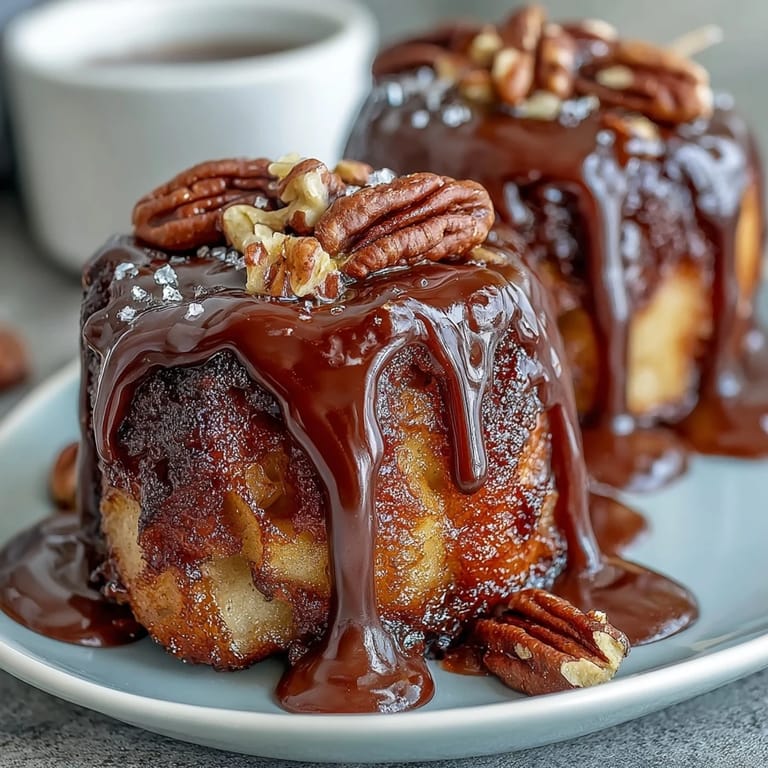
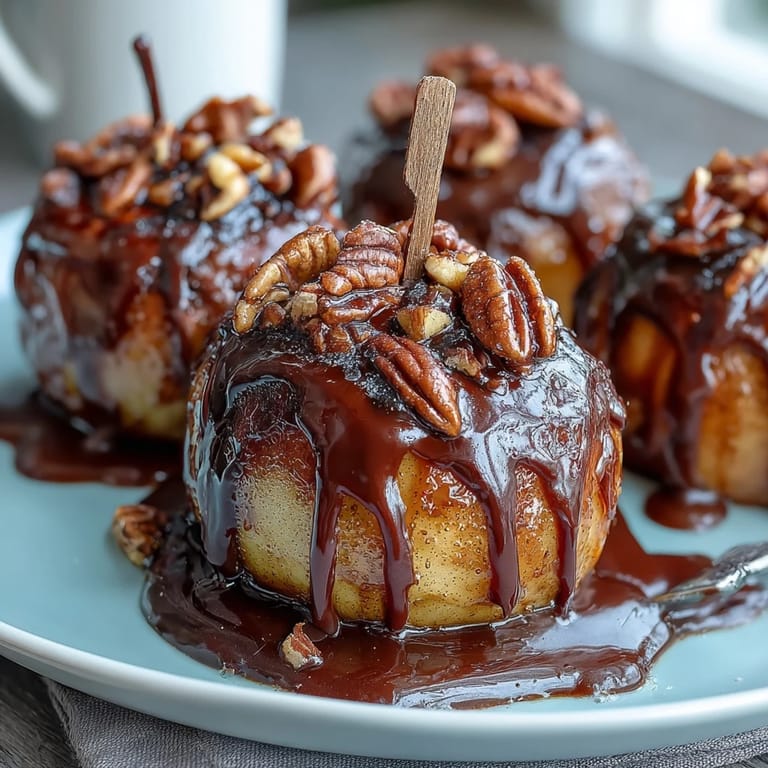
Save There's something about the smell of caramel melting on the stove that instantly transported me back to a autumn afternoon when my neighbor brought over a box of homemade candy apples. I bit into one and the crisp apple snapped between my teeth, followed by that buttery caramel and then dark chocolate—it was pure magic. Years later, I found myself recreating that moment in my own kitchen, but with a twist: instead of whole apples, I made these elegant little slices that feel fancy enough for a dinner party yet simple enough to whip up on a random Tuesday. The beauty of this version is that you get all the nostalgia in bite-sized pieces, perfect for sharing or sneaking to yourself while no one's looking.
I'll never forget the first time I made these for my book club—I was nervous about the timing, worried the caramel would seize or the chocolate would look messy. Instead, everyone's face lit up when they saw the little drizzled slices arranged on a board, and someone asked if I'd bought them from a fancy bakery. That moment taught me that homemade doesn't need to be complicated to feel special, and sometimes the simplest recipes are the ones that linger in people's memories the longest.
Ingredients
- Crisp apples (Granny Smith or Honeycrisp): The tartness cuts through the sweetness beautifully, and these varieties hold their texture without getting mealy. I've learned the hard way that softer apples turn mushy, so don't skip the quality here.
- Lemon juice: This prevents that sad brown oxidation that happens within minutes, keeping your slices picture-perfect and fresh-tasting.
- Soft caramel candies: Using candies instead of making caramel from scratch removes the guesswork and burn risk—honestly, this is the secret to making these stress-free.
- Heavy cream: Just two tablespoons loosens the caramel to the perfect dipping consistency without making it greasy or runny.
- Dark chocolate (60–70% cocoa): This percentage balances bitterness and sweetness, creating an elegant contrast that doesn't overshadow the apple. Anything darker tastes too intense, anything lighter feels cloyingly sweet.
- Coconut oil or butter: A teaspoon thinned the chocolate to a silky, dippable consistency that sets beautifully without cracking.
- Garnishes: Toasted nuts add crunch, sprinkles bring joy, and flaky salt amplifies all the flavors—choose what speaks to you.
Tired of Takeout? 🥡
Get 10 meals you can make faster than delivery arrives. Seriously.
One email. No spam. Unsubscribe anytime.
Instructions
- Prep your apples with intention:
- Core and slice your apples into 6 wedges each, then toss them immediately with lemon juice and pat them completely dry with paper towels—any moisture will prevent the caramel from sticking properly. Insert a popsicle stick or sturdy skewer into each slice so you have something to hold without your fingers getting sticky.
- Create silky caramel magic:
- Place unwrapped caramel candies and heavy cream in a small saucepan over low heat, stirring gently until you've got a smooth, glossy mixture that looks like melted velvet. Let it cool for 2–3 minutes—this prevents the apple from getting too warm, which could soften it.
- Dip with confidence:
- Hold each apple slice by its stick and dip it halfway into the caramel, letting the excess drip off so you get an even coating without a messy pool on the bottom. Arrange them on parchment paper and refrigerate for exactly 5 minutes to let the caramel set firm.
- Melt chocolate like you mean it:
- Chop your dark chocolate and combine it with coconut oil in a microwave-safe bowl, then melt in 20-second intervals, stirring between each burst so it melts smoothly without seizing. This gentle approach prevents that grainy, broken chocolate that nobody wants.
- Drizzle with flair:
- Using a spoon or piping bag, create those beautiful chocolate threads across each caramel-coated slice. If you want toppings, sprinkle them immediately while the chocolate is still soft enough to stick.
- Set and serve:
- Chill for another 5–10 minutes until the chocolate hardens, then serve them chilled or let them come to room temperature depending on your mood.
 Save
Save These little slices became my go-to when friends stopped by unexpectedly and I needed something that looked thoughtful but didn't require hours of effort. There's something deeply satisfying about creating something beautiful in less than 30 minutes—it shifts the whole energy of a kitchen moment from stressed to joyful.
Why These Slices Win Over Whole Apples
Making individual slices instead of dunking whole apples changes the entire dynamic of the eating experience. You get a perfect ratio of crisp apple to caramel to chocolate in every bite, and there's no awkward moment where you're gnawing on a stick trying not to get it all over your face. Plus, they're shareable in a way that feels generous and elegant—you can plate them beautifully, arrange them on a board, or package them as a gift without the presentation stress of whole apples.
The Art of Not Overthinking the Toppings
I spent way too long one afternoon trying to get garnishes to look Pinterest-perfect, arranging each nut with tweezers like some kind of candy apple artist. Then I realized the magic happens when you just sprinkle generously while the chocolate is still soft—imperfection is actually what makes these feel homemade in the best way. The nuts toast better when you've toasted them yourself beforehand, the sprinkles catch the light more beautifully when they're scattered freely, and the flaky salt draws out the caramel sweetness in ways that perfectionism would have missed.
Timing, Temperature, and Small Victories
One of the most delightful things about this recipe is how forgiving it actually is once you understand the basic rhythm: prepare, coat, chill, decorate, chill again. I've made these on humid summer days and cool autumn mornings, and the process feels almost meditative—there's enough hands-on time to feel connected to what you're making, but enough waiting time to pour yourself a drink and breathe. The real win comes when you pull them from the refrigerator and the chocolate snaps just slightly under your teeth before melting, and the apple is still impossibly crisp—that's the moment you know you've nailed it.
- Don't stress if your chocolate drizzle looks wonky; it's actually more charming than perfect stripes.
- Room temperature tastes different from chilled—try both and decide what you prefer.
- These genuinely taste best on the day you make them, so this is not a make-ahead-for-next-week situation.
 Save
Save These candy apple slices taught me that sometimes the most memorable food moments come from taking something classic and making it your own through small, intentional changes. They're the kind of treat that reminds you why you love cooking in the first place.
Questions & Answers
- → How can I prevent apple slices from browning?
Toss the apple wedges in lemon juice immediately after slicing to maintain their fresh, crisp appearance and prevent oxidation.
- → What type of apples work best for this treat?
Firm, crisp varieties like Granny Smith or Honeycrisp are ideal as they hold their shape well and provide a tart contrast to the sweet caramel and chocolate.
- → Can I substitute dark chocolate with other types?
Yes, white or milk chocolate can be used for a sweeter variation, adjusting the drizzle to taste.
- → How do I properly melt the caramel and chocolate?
Melt caramel candies with heavy cream over low heat until smooth, and melt dark chocolate with coconut oil or butter in short microwave intervals, stirring between each.
- → What garnishes complement these apple slices?
Toasted nuts like pecans or almonds, colorful sprinkles, and a pinch of flaky sea salt add attractive texture and enhance flavor profiles.