Save
Save The first time I saw a rainbow jelly cake gleaming under the fluorescent lights of a night market, I couldn’t help but stop in my tracks. The colors practically hummed with vibrancy, and the wobbly texture teased me with the promise of sweetness and fun. That memory stuck with me for years before I finally gathered the courage—and the agar-agar—to try making it at home. The kitchen was soon filled with giggles and streaks of color as I experimented with my own version, layering each glistening hue with childlike anticipation. Every slice felt like unveiling a secret celebration inside a cake pan.
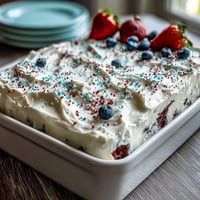
My cousin’s birthday happened to fall on an impossibly hot day last June, so instead of the usual baked confection, I showed up with this rainbow jelly cake shimmering in an icebox. The whole family hovered by the fridge, peeking inside every few minutes to check if it had set while we sipped iced tea and played cards around the table. When I finally unmolded it, the kids gasped as if I’d pulled off a magic trick. I still remember my aunt asking how the layers stayed so perfect—little did she know how I’d hovered anxiously with every pour, counting down the chilling minutes. It was the kind of afternoon where kitchen messes didn’t matter and everyone lingered a little longer for another slice.
Ingredients
- Agar-agar powder: The key to that perfect springy jelly texture, but don’t be tempted to use gelatin—it simply won’t set as firm or glossy, and agar needs to be fully dissolved for clarity.
- Water: The base for dissolving agar-agar and creating those dreamy, transparent layers, so use filtered water if your tap is strongly flavored.
- Granulated sugar: This is what brings sweet brightness to each bite; if you’re after subtler sweetness, you can shave off 20 grams, but don’t go too low or the jelly will lose its luster.
- Food colorings (red, orange, yellow, green, blue, purple): Go bold for a true rainbow—liquid or gel both work, but start sparingly and blend for clarity without muddiness.
- Vanilla extract (optional): A mellowing touch that unites the flavors, but try to use clear extract to keep your colors vibrant.
- Coconut cream: Thick and luscious, coconut cream transforms the top layer into a velvety, tropical finale—shake the can well before measuring as the cream and water can separate.
- Pinch of salt: Just a nudge of salt brings out the richness in the coconut and makes everything else taste even brighter.
Tired of Takeout? 🥡
Get 10 meals you can make faster than delivery arrives. Seriously.
One email. No spam. Unsubscribe anytime.
Instructions
- Make the Agar Base:
- Start by whisking 2 tablespoons of agar-agar powder into 900 ml water in a medium saucepan. Once it simmers, listen for that gentle burble as the powder dissolves—keep stirring constantly to avoid any stubborn clumps, about 3 minutes.
- Sweeten and Scent:
- Add 200 g of sugar (and a few drops of vanilla if you like) and stir until the mixture clears and all grains are gone. The steam will carry a delicate, almost floral note through your kitchen.
- Divide and Color:
- Remove from the heat and separate the clear jelly base into six bowls. Add a few drops of food coloring to each, stirring gently until each bowl glows a distinct, cheerful hue.
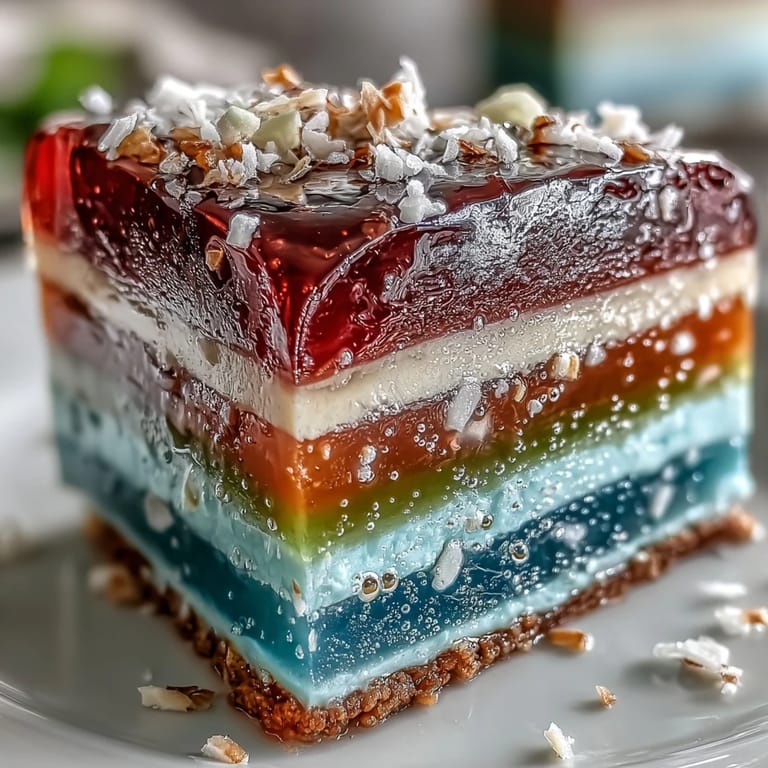
- Layer and Set:
- Pour the red mixture into your mold first—it should spread smoothly but will start to set quickly, so don’t dawdle. Wait 5–8 minutes until the surface jiggles slightly but does not flow, then carefully add the next color—repeat for every rainbow layer, resisting the urge to rush.
- Make the Coconut Cream Layer:
- In a clean saucepan, combine 2 tablespoons agar-agar powder, 400 ml coconut cream, and 200 ml water, whisking all the while. Simmer gently, fold in 100 g sugar and a pinch of salt, and stir until you can’t see any more granules.
- Finish with Coconut:
- When the last jelly layer feels firm to the touch, slowly pour the warm coconut mixture over the top. Aim for a slow pour so each rainbow stays sharp beneath the snowy white finish.
- Chill and Unmold:
- Let your creation cool at room temperature, then move it to the fridge for at least an hour until completely set. Run an offset spatula around the edges, gently loosen, and invert onto your proudest serving plate.
- Slice to Serve:
- Cut into neat slices or cubes, admiring the stripes with every cut. Serve chilled—watch how fast those colors disappear from the platter.
 Save
Save 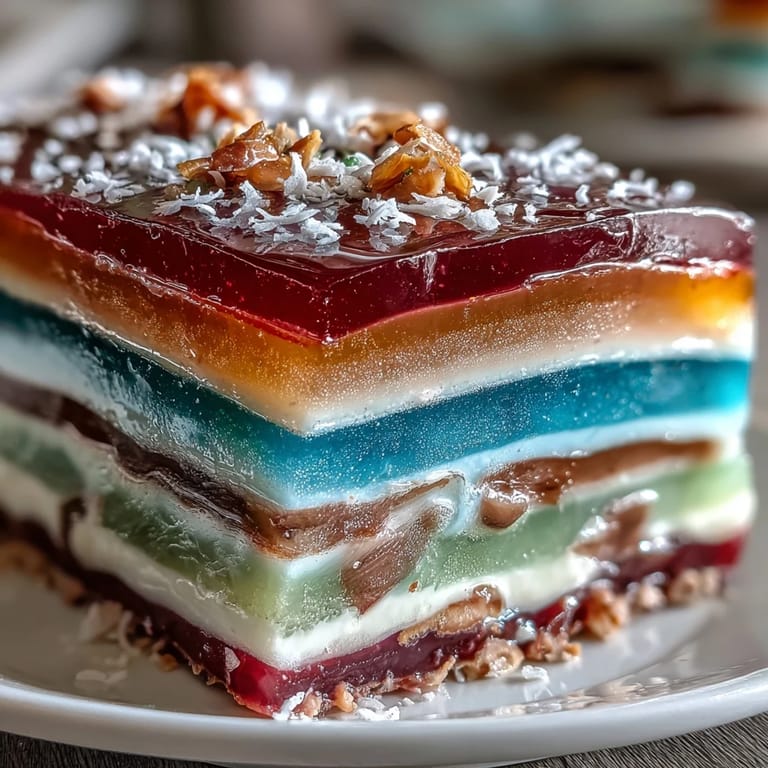 Save
Save There’s this photo on my phone—a sliver of rainbow jelly cake glinting in the dusk, next to the sparkle of laughter from friends clustered around the patio table. That night, my dessert was the conversation starter, and every bite seemed to stretch out the golden hour just a bit longer. I think that’s when I realized this cake isn’t just for show—it turns even plain summer evenings into tiny celebrations.
How to Get Super Clean Layers
As soon as each jelly layer sets enough to hold but is still a bit warm, gently pour on the next color—this allows clean bonds without melting the previous stripe. I’ve learned to watch the clock but also trust my fingertip; a slight jiggle and barely tacky surface is exactly right. If you go too fast, the colors swirl, too slow and you might get visible seams. Having all your tinted mixtures ready before you begin streamlines the process and keeps your nerves in check. Most importantly, resist poking impatiently—good things, as my mother says, come to those who wait.
Play With Flavors and Textures
Subtle flavor additions can send this cake in countless directions—a dab of rose or pandan in the jelly, or citrus zest gently whisked into the coconut layer. I sometimes swap out plain vanilla for a touch of almond or a hint of orange blossom, depending on the occasion. If you find coconut cream too rich, light coconut milk works, though the final layer will be slightly less velvety. For a fun surprise in the final layer, try folding in tiny morsels of fresh fruit just before it sets. Each batch is a new adventure, and half the fun is tweaking it to fit your mood or what’s in the pantry.
Serving and Storing Tips You’ll Actually Use
The jelly keeps beautifully for up to three days in the fridge, covered to avoid absorbing other flavors. Cold slices are the most refreshing, and I love pairing leftovers with iced coffee or fruit for an impromptu treat. The cake’s sturdiness means you can transport it to picnics or potlucks with little worry—just pack it in its mold and flip out when you arrive.
- Use a damp knife when slicing to keep edges neat.
- If unmolding feels tricky, dip the mold bottom briefly in warm water before inverting.
- Leftovers make happy snacks at midnight or breakfast on a whim.
 Save
Save  Save
Save Making this rainbow jelly cake feels like creating edible joy. I hope it brightens your next gathering and leaves you with your own stories worth remembering.
Questions & Answers
- → Can I use powder gelatin instead of agar-agar?
Agar-agar sets at room temperature and yields a firmer, slightly more brittle gel than gelatin. Substituting gelatin will change texture and chilling needs; reduce agar quantities if converting to gelatin and note gelatin is not vegan-friendly.
- → How do I get clean, even layers without colors bleeding?
Pour each colored layer thinly and let it set until just firm (skin forms but still slightly warm). Work with slightly cooled mixtures and chill briefly between pours; a gentle pour down a spatula or over the back of a spoon reduces disturbance.
- → What mold shape works best for neat slices?
A 20 cm round or rectangular mold gives even, sliceable layers. Smooth-sided molds release more cleanly; line edges with a flexible spatula when unmolding and invert gently once fully chilled.
- → How long should the cake chill before serving?
After the coconut-cream layer is set, refrigerate at least 1 hour until completely firm. Longer chilling (2–3 hours) improves sliceability and helps flavors meld without becoming too soft.
- → Can I add flavors to the colored layers?
Yes. Mild extracts like vanilla, pandan, or rose work well in small amounts. Use water-soluble natural colorings to avoid off-flavors and adjust sugar slightly if adding stronger extracts.
- → How should leftovers be stored?
Cover and refrigerate for up to 3 days. Keep in an airtight container to prevent the coconut cream from absorbing other fridge odors and to maintain glossy layers.