 Save
Save My neighbor texted me at 11 PM asking if I could whip up something special for her son's graduation party the next afternoon. I almost said no, then remembered these cupcakes—the kind where the frosting does half the work and the toppings do all the celebrating. Twenty minutes of prep and suddenly you have twelve little edible mortarboards that actually taste like they mean something. Sometimes the best ideas arrive last-minute, when there's no time to overthink them.
I'll never forget watching that mom hand out the cupcakes at the backyard party—everyone stopped mid-conversation to admire them before eating. One graduate's little sister declared them "too pretty to eat," which lasted about thirty seconds. That's when I knew these weren't just cupcakes; they were a tiny edible announcement that something worth celebrating had happened.
Ingredients
- All-purpose flour (1 1/2 cups): The foundation that keeps these light and tender without being dense or crumbly—make sure it's leveled off, not packed.
- Granulated sugar (1 cup): This sweetness needs that butter creaming to build structure; don't skip the mixing time even though you're tempted to rush.
- Unsalted butter, softened (1/2 cup for batter, 1/2 cup for frosting): Softened means leaving it out for thirty minutes, not microwaving it—your cupcakes will thank you with an even crumb.
- Large eggs (2): Room temperature eggs mix more evenly into the batter, creating that light, fluffy texture that makes people ask for the recipe.
- Whole milk (1/2 cup for batter, 2 tbsp for frosting): This brings moisture and richness that water just can't deliver, so don't substitute it.
- Baking powder (1 1/2 tsp): Check your box—old baking powder loses its lift, so if it's been sitting for a year, grab a fresh one.
- Salt (1/4 tsp for batter, pinch for frosting): A tiny amount you barely notice but absolutely need; it balances sweetness and makes vanilla sing.
- Pure vanilla extract (1 1/2 tsp for batter, 1 tsp for frosting): Imitation will work in a pinch, but pure vanilla creates warmth that guests actually taste.
- Powdered sugar, sifted (2 cups): Sifting breaks up lumps before mixing; otherwise you'll chase grittiness through your whole frosting.
- Mini peanut butter cups (12) or chocolate squares: These form the cap crown—peanut butter adds richness, but chocolate-only works perfectly for allergies.
- Chocolate square candies (12): The flat base of your mortarboard; individual squares give you clean edges.
- String licorice or sour candy strips (12 pieces): These become your tassels and add whimsy—bright colored ones look especially festive.
- Mini M&Ms or candy pearls (12): The tiny button that finishes your cap; pearls look elegant, M&Ms add playfulness.
- Melted chocolate or frosting (for assembly): Your edible glue; use just a dab so pieces stay put without oozing.
Tired of Takeout? 🥡
Get 10 meals you can make faster than delivery arrives. Seriously.
One email. No spam. Unsubscribe anytime.
Instructions
- Heat your oven and prepare:
- Preheat to 350°F and line your muffin tin with paper liners—this step prevents sticking and makes serving so much cleaner. Take a moment to make sure your oven rack sits in the middle; cupcakes bake more evenly there.
- Cream the butter and sugar:
- Beat them together until the mixture looks pale and fluffy, about 2-3 minutes—this traps air that makes your cupcakes light. You'll know it's ready when it looks almost like frosting itself.
- Add eggs and vanilla:
- Drop in one egg, let it fully blend before adding the second, then stir in vanilla and listen for that subtle change in sound as everything becomes smooth. Rushing this step means you risk streaky batter.
- Mix in dry ingredients and milk:
- Start with half the flour mixture, blend it gently, then add milk, then the remaining flour—this three-part method prevents overmixing, which is the cupcake killer. Stop as soon as you don't see dry streaks.
- Fill and bake:
- Divide batter evenly using a small ice cream scoop or spoon, filling each liner about two-thirds full, then bake for 18-20 minutes until the tops feel set and a toothpick comes out clean. Let them cool in the tin for five minutes before moving to a wire rack.
- Make the buttercream frosting:
- Beat softened butter until it's pale and smooth, then gradually add powdered sugar so you don't create a cloud of powder in your kitchen—add milk and vanilla and keep beating until it's light and spreadable. Taste it and adjust vanilla or salt if needed.
- Frost the cooled cupcakes:
- Use a spatula or small piping bag to create a swirl on each cupcake; the frosting should be thick enough to hold a shape but soft enough to spread without tearing the cake. A little peaked swirl on top looks more intentional than a flat layer.
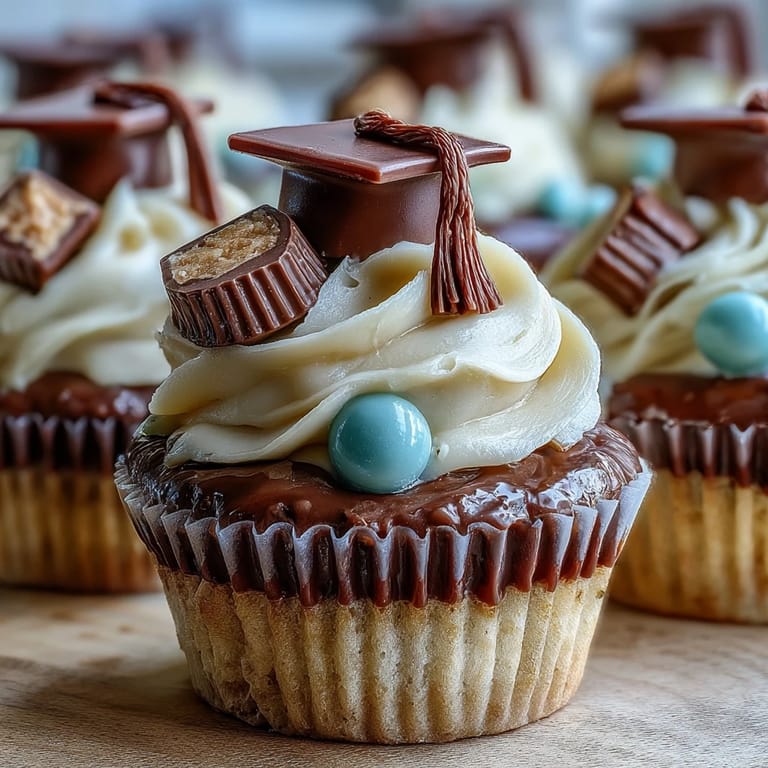
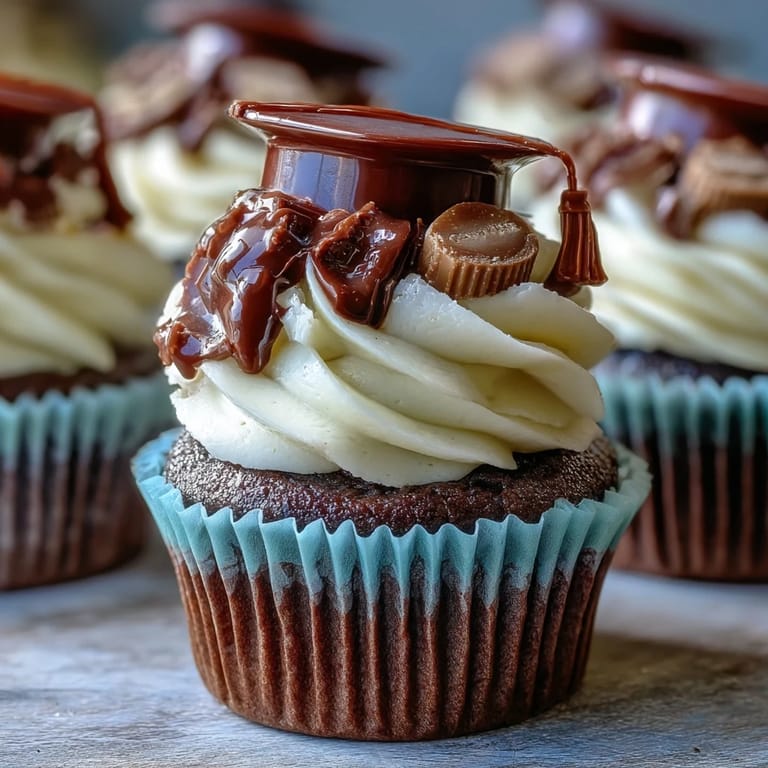
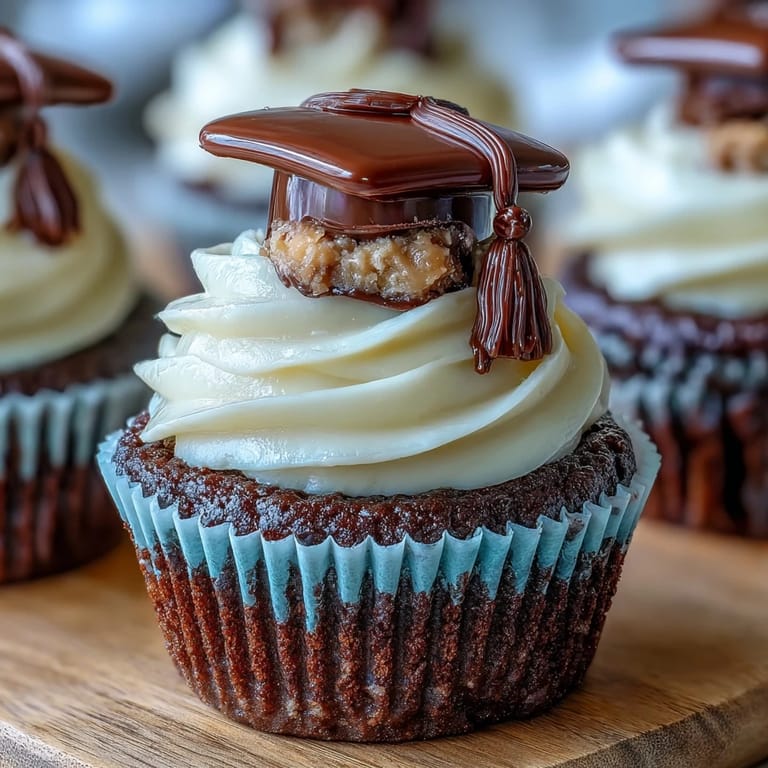
- Build the graduation caps:
- Lay a chocolate square flat on your work surface, then dab a tiny bit of melted chocolate or frosting on its center and press your peanut butter cup upside-down into it—this is your mortarboard and cap crown. Attach a licorice piece as the tassel to one side and a candy to the top as the button, then let everything set for a few minutes so it stays put.
- Crown your cupcakes:
- Once the caps are firm, carefully place one on top of each frosted cupcake—they should sit at a slight angle, not perfectly centered, which somehow looks more celebratory. Step back and admire what you've made.
 Save
Save There's something magical about watching someone's face when they realize a tiny candy sculpture is sitting on top of their dessert. At that graduation party, more photos were taken of the cupcakes than of anything else—and that's exactly the point of a celebration dessert. Food that makes people pause and smile before they even taste it does half the work of the party itself.
Customizing for School Colors
I added a drop or two of food coloring to the buttercream when my friend mentioned her daughter's school colors were burgundy and gold. The frosting took on a rich wine tone that looked sophisticated, and topping it with gold candy pearls instead of M&Ms made it feel intentional. If you're coloring frosting, add color gradually—a drop goes a long way, and you can always add more but can't take it back.
The Nut-Free Swap
Not everyone can have peanut butter cups, so I've made these with chocolate squares on top of chocolate squares, and honestly, they taste just as good. The key is choosing candies that feel substantial and don't melt into a puddle—Ghirardelli squares hold their shape beautifully, and so do good quality chocolate wafers. When you're buying your toppings, grab the peanut butter and regular chocolate versions in the same shopping trip so you have both options ready.
Storage and Make-Ahead Tips
These cupcakes sit happily at room temperature for two days in an airtight container, which means you can make them the morning of a party without stress. If you're making them the day before, frost them first thing the next morning and add the caps no more than two hours before serving—the licorice tassels can soften if they sit too long in humid frosting.
- Keep the caps in a cool, dry place separate from the frosted cupcakes until the last possible moment so they stay crisp and structured.
- If your kitchen is warm on the day you're frosting, chill your frosting bowl between uses so the frosting stays spreadable and doesn't get greasy.
- Transport cupcakes in a sturdy box with dividers; graduation parties deserve cupcakes that arrive looking as celebratory as they taste.
 Save
Save Graduation is one of those moments worth marking with something handmade and thoughtful, and these cupcakes do exactly that. They're simple enough to pull together on short notice but special enough that everyone remembers them long after the party ends.
Questions & Answers
- → How do I make the edible cap toppers?
Attach a chocolate square candy flat-side up, add an upside-down mini peanut butter cup centrally with melted chocolate or frosting, then add a licorice tassel and a mini candy button. Allow to set before placing on cupcakes.
- → Can I substitute ingredients for allergies?
Yes, replace mini peanut butter cups with nut-free chocolate squares to accommodate peanut allergies. Always double-check candy labels for allergens.
- → What is the best way to store these cupcakes?
Store in an airtight container at room temperature for up to two days to maintain freshness and texture.
- → Can I customize the frosting color?
Certainly! Add food coloring to the buttercream frosting to match school or party colors before spreading on the cupcakes.
- → What baking tools are required?
A muffin tin, paper liners, mixing bowls, electric mixer, spatula, and piping bag or spoon for frosting are recommended for best results.